DecRenew Interior's Photoshoot

(photo by Ruthie Staalsen)
As I posted in my last post, I had a photo shoot this weekend in my home.  Ross Odom, Photographer wanted some home interior shots to add to his portfolio.  Thanks to Ross, the photo's do capture the way I mix items in my own personal design style.  You'll see the international flair I've tried to incorporate from our travels that tell a story about our lives and the places we've lived.  Our humble abode is the place where I experiment with design and it's the place that I especially love to be when I need down time. It's far from perfect, but that is what makes it feel comfortable and inviting.  I hope others feel the warmth when they are welcomed in through the front doors.  I thought I'd share a few of my favorites with you.
Some of the photo's below are ones that I took that same day.
(photo by Ruthie Staalsen)

(photo by Ruthie Staalsen)

(photo by Ruthie Staalsen)
Hope you are keeping warm this weekend, it's getting chilly here in Dallas.
Visit my website DecRenew Interiors to see my design portfolio.

Photo Shoot Prep

(Photos by Ruthie Staalsen)
I'm preparing for a photo shoot tomorrow and am having lots of fun preparing vignettes for it.  I just spent a fortune at Central Market and my creativity was going wild as I walked down the vegetable, fruit, wine, cheese and bread isles!
The grocery store has lots of treasures!
The above vignette was arranged on a round mirror I had (you know I'm a believer of "using what you have") and I think it's coming together!  The best part is that my husband and I get to enjoy the goodies this weekend.
These Asian Pears are enormous and have such great texture and color.
These huge Hydrangea will go in this moss covered urn and will look so soft and natural!
I'll keep you posted with more photo's later after the photographer does his magic!

Spanish Wall Complete

My wonderful husband finally finished our Spanish wall!
It was a long process because of all that was involved.  He had to run electrical, add a sprinkler system, add drains, build the wall with cinder blocks, add the stucco to the wall, paint, lay the pavers, etc, etc.   He is celebrating that he is done and I'm praising him for the finished product!  He actually made the wrought iron arch too, welded every piece of it from his leftover scraps! 
Visit this blog post here to see our gazebo process a couple years ago!  This wall is Phase II of the backyard project.
It's a great addition to the backyard and separates the pool area from the rest of the yard.  The white stone was discovered the first week we moved in about 3 years ago (probably left over from pool work) so we used it for this project.  I especially love how my husband placed it on the top of the wall and then also how he created a nice walkway through the arch.
We planted Jasmine and I can't wait for it to creep over the arch!
My husband created the lights while I was away on my missions trip to Spain.  They were my surprise (up on the wall and working) when I returned home and I LOVED them.   The funny part was that I purchased lights for the wall while I was in Spain and thought I'd surprise him!!!!!  Whoops!
I LOVED the ones he created so much that we hung the ones I purchased on the back of the house so they coordinate well!  Same concept and their shadows look delightful at night!
The up/down lights look beautiful at night too and I love looking out at the wall while I do dishes in my kitchen.
For the wall color, I mixed several paint colors to get just the right color I had in mind and then used a glaze to make it look older than it really is!
By the time springtime comes along,  I'd love to have a variety of pots and flowers like these to add a coloful flair to the wall!
We are now waiting for our house name plaque "Casa Roca" (Rock House) to finish the project off totally.  We named the house that since we have so many giant rocks in our front and backyard!
Go here to visit the blog post about my rose garden and the rocks.
Visit my website DecRenew Interiors to see my design portfolio of before and after pictures.

Room Rearrange by Jennifer

I'm so proud of one of my blog followers who read my blog post "Kitchen Sitting Rooms" here and decided to do something about the space in her home that wasn't working for her family life.
Jennifer is a fun loving, vivacious, talented and spunky woman!  She didn't hesitate when I gave the challenge on my blog to "change things up" in your homeShe moved the kitchen table and chairs out of her eating area in her kitchen and decided to make it a sitting area
Here are the before and after photo's she sent me!
BEFORE

Looks good but wasn't functional for her family.
AFTER
"Using what you have" and it looks great!!!!  Way to go Jennifer!
AFTER

I thought it would be fun to add some details to her room.  Hopefully this will inspire Jennifer as she adds layers over the months to this space.  These things take time depending on your budget but it's always great to have a vision and a plan so you know where you are headed.
MY DESIGN PLAN
Suggest a rug for defining the space and adding texture and style. Drapes to add a cozy feel and add height to the room (hang at top of wall).    Throw pillows for personality, another round mirror above existing mirror to add height,  paint the desk chair green to coordinate with pillows, a leopard throw for ottoman or for back of chair, buffet lamp for table to add more ambient light and a vintage suitcase to add a bit of "collected" to the feel of the room (also making the smaller lamp more to scale between the chairs).


I'd also recommend adding this artwork to the wall on the left to bring all the colors together. This unifies the space, making it look COMPLETE.
Here's where the items can be purchased:
Table Lamp by Uttermost, Rug and draperies by Pottery Barn, Leopard throw by Horchow, Artwork by Art.com, Vintage trunk can be found at any antique mall, pillows custom made (Pattern name: Arito Celebration).
Thanks for sharing your project with me Jennifer, as you can see, it inspired me!
Visit my website here to see before and after pictures to inspire you!

Ceilings with attitude

(Valerie Deroy Interiors)

I've been doing a lot of "walk thru" consultations this month.  This consultation is where I spend 2 hours with my client and we walk thru their problem areas in their home and we come up with a solution.  I choose paint colors, give ideas & suggestions, answer questions they have about their thoughts and inspirations, help them choose the best flooring options, and help my client create a vision for their homes.  Nobody wants to be "stuck" with their decorating problems, I'm their solution so they can be "unstuck" and move forward with confidence.

(Adam Zollinger - Designer)
As you know, one of the best ways to make a statement in your home for the least amount of money, is to paint.  Painting is the first thing I recommend my clients to do! 
(Beverly Bradshaw Interiors)

I usually recommend that my clients paint their ceilings something other than white!  It always baffles their minds and they can't get it...until they "trust me" and do it in faith that I know what I'm doing. 

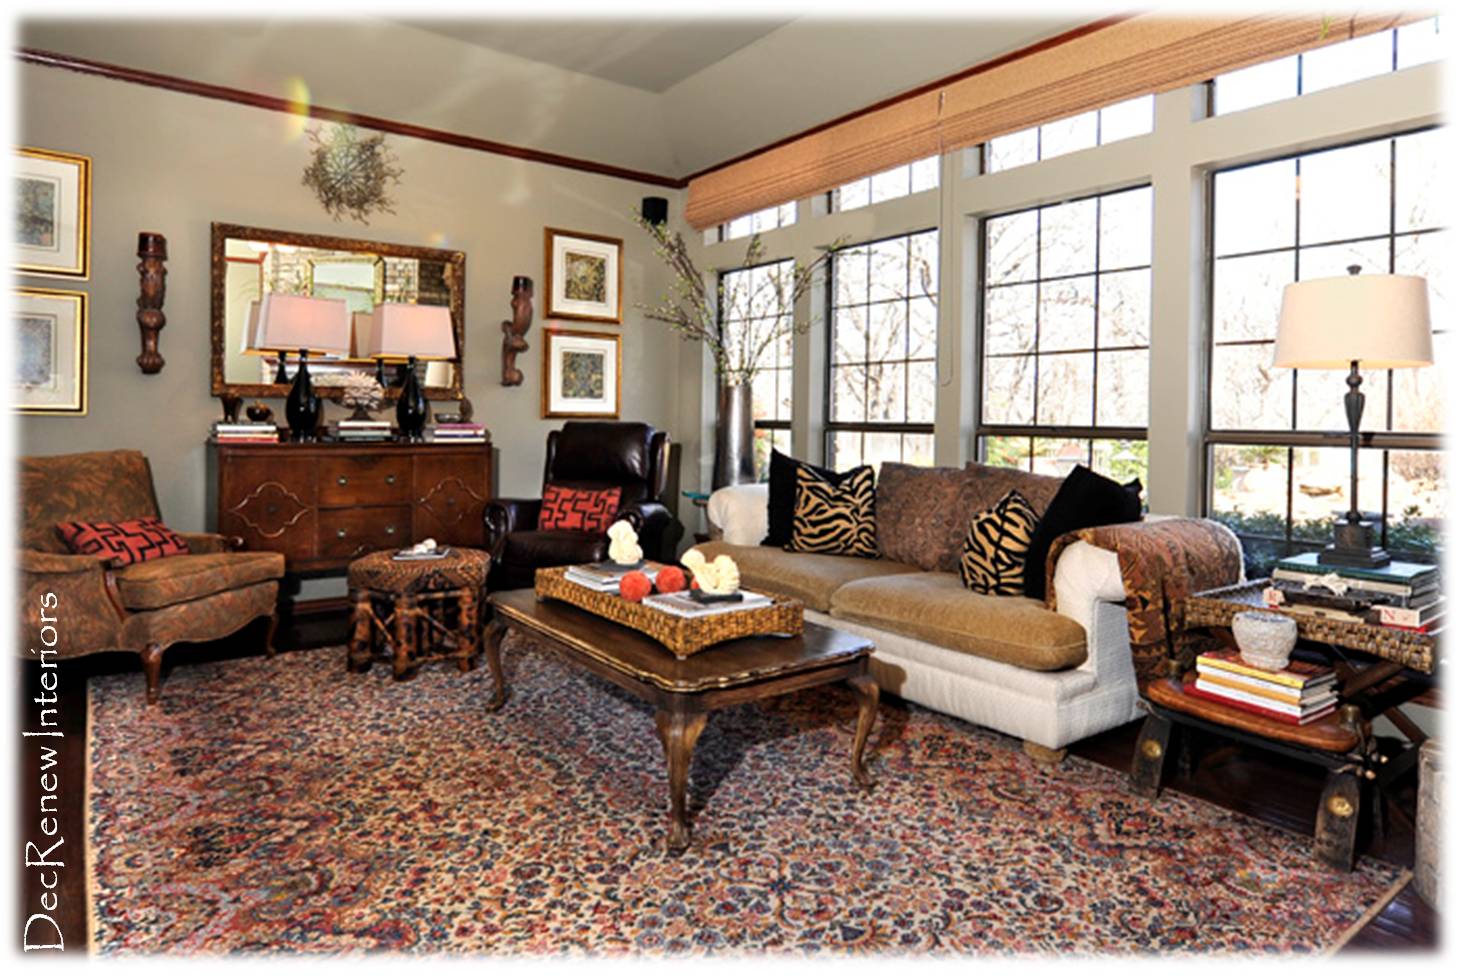
The above room is beautifully decorated!  However, when you look at the photo, what your eye goes to is the white line above the crown molding.  If they had painted the ceiling either the same brown or a lighter shade of brown it would make it much more restful to your eye.  Of course a hot pink ceiling or a blue ceiling (the color of the drapery or blanket) would have been my suggestions for this "girlie girl" room.  It also makes your crown molding come to life.  Why pay money to have this wonderful detail if it isn't even showcased?
(Liz Williams Interiors)
Don't be afraid to be bold.  I always say "if it makes you nervous, it's probably going to be what you love the most after you paint."
(RLH Studios)

Yes, even in small spaces!  This looks so rich.  Imagine it without the brown ceiling.  It wouldn't be near as effective and beautiful.  Yes, even in a small space!

(Rough Hollow Parade of Homes 2010)
A colorful ceiling can be what ties the room together. 
(SH Interiors)
It can make a statement in your home!
(Pinterest)
Go wild and crazy if you feel like it! Wyatt is going to wake up a happy boy in this room!
(Frederick and Frederick Architects)

Subtle is amazing too!

Make a statement on your patio's as well!

This homeowner painted their floor and ceiling the same color and it's to die for!
(Jennifer Brouwer Interiors)
Subtle and such a haven!  Beautiful job Jennifer!

Don't be afraid of change!

This technique is not for every space.  There are factors to consider.  It depends on the light in the room, the color that you are using and the way you want the room to feel.  Also remember, don't go overboard! Not every ceiling in your home should be painted a different color! 
When in doubt about what to do, call a professional!
(Witt Construction)
If you need coaching, call me for a "walk thru" consultation and let me help you make some decisions that will change the way you feel about your home!  Nobody wants to be STUCK!
Click the "fees" link to see my "walk thru" rates.
Visit my website DecRenew Interiors to see before and after pictures of my room transformations!